How to Run a Base Node: Requirements and Setup

Deen Newman
August 15, 2025
20 min read

To run a Base node, expect to need a beefy server or cloud VM (8+ cores, 32+ GB RAM), plan on hundreds of GB of disk space for a full node and much more for archive.
Why run one? If you’re building anything on the Base blockchain – a wallet, a dashboard, a bot, or any dApp – at some point, your code has to plug into a Base node.
Of course, not every builder needs to shoulder that infrastructure. Instead, hosted blockchain RPC endpoints provide everything developers might need.
In this post, we’ll explore what Base nodes are, why run one, and how to meet the hardware, software, and network requirements to do so. We’ll also walk through a quick tutorial for spinning up a node and using node providers as a simpler alternative.
What are Base nodes
The Base blockchain doesn’t live on any single server or website – it lives on a network of computers called nodes. Node here is one of the machines (servers or PCs) with the Base client installed that actually runs and maintains the network.
When an application, user, or developer wants to:
Know what’s true on-chain (balances, past transactions, contract state), it has to ask one of those nodes.
Make changes (deploy smart contracts, send a transfer), it has to hand its signed request to a node so it can relay it into the network.
Without talking to a node, there is no way to verify data or push new transactions onto the chain.
Types of nodes in Base
To better understand the role of nodes in the Base blockchain, let’s look at the main type of these nodes and their main responsibilities within the network.
Full Node: Stores the current blockchain state and recent history necessary to validate new blocks and transactions. Full Base nodes let you query balances, call contracts, and send transactions. They require substantial storage and CPU/RAM, but much less than archive nodes.
Archive Node: Stores all historical states of every block since genesis. This allows queries on past contract and account states. Archive nodes require massive storage, often tens of terabytes, and growing rapidly.
RPC Nodes: Rather than a separate class, these are nodes in either full or archive mode that respond to RPC calls. They are typically managed by the RPC provider. Using a hosted node means getting API access to HTTP/WebSocket Base endpoints without having to maintain hardware.
Validators: Base is an OP-stack rollup, so there is no traditional staking involved. The “sequencer” (block producer) role is currently permissioned, so hobbyists don’t run Base validator nodes.
In summary, the main decision when choosing which type of Base node to run is full vs archive, and whether to use a node provider.
What is Base?
Base is an EVM-equivalent Layer‑2 chain launched by Coinbase in August 2023. Built on Optimism’s OP Stack, it executes transactions off‑chain and publishes state roots to Ethereum, inheriting its security guarantees but delivering much lower fees and faster block times.

Base accounting for over 63% of all unique addresses interacting with any Ethereum‑ecosystem chain / Source: growthepie
Base’s growth has been explosive. By mid-2025, it surpassed most rival L2s in key metrics: user TVL, user activity, and throughput.
For developers, Base offers Ethereum-like infrastructure but with L2-scale performance and fees, plus Coinbase’s ecosystem support. In practice, this yields a real influx of builders. Today Base is the most popular EVM network by developer activity, boasting around 5,000 active deployers in a 28-day window.
Why run a Base node?
Access to a Base node – whether it’s one you run yourself or a managed endpoint – gives you the canonical gateway into Coinbase’s L2 network. Let’s look into who may need to run one and why:
dApp teams and Web3 enterprises: Developers building on Base run full or archive nodes for building complex smart-contract flows and direct JSON-RPC access to control how their application reads from and writes to the Base network.
Exchanges, wallets & indexers: Services like Coinbase, block explorers, portfolio trackers, and analytics firms to power their backends.
Hobbyist node operators: Enthusiasts who value decentralization and want to verify blockchain data themselves.
That said, rather than running any node, any of these use cases can rely on a hosted service. One option is to start with free Public Base RPC endpoints. They aren’t suited for production due to usage limits and unfiltered access, but work well as a backup for non-critical tasks and a decent point of access for new developers and early MVPs.
Live applications and services choose Node-as-a-Service providers. Companies like GetBlock manage and scale Base RPC nodes for clients, offering shared or private endpoints with SLAs. GetBlock’s shared endpoints also have some rate limits, ranging from a Free plan with tight limits to the Enterprise tier with the most generous quotas. Dedicated, private Base node service, however, removes any caps and offers the same customizability as a DIY node.
Base node requirements
For anyone willing to venture self-hosted, we break down the latest Base node hardware specs, software prerequisites, and deployment steps in the following sections.
Software requirements: Choosing a Base node client
As it was mentioned before, Base node operators run only the execution client. The Base repo supports three clients for this purpose: Geth, Reth, and Nethermind.
In short:
Geth (Go): Canonical OP-Stack client. Good stability for a full node. Geth archive, however, is not recommended for Base.
Reth (Rust-based): A newer ETH client optimized for OP-Stack. Mainly used for an archive mode. Base’s team plans to make Reth the primary client long-term.
Nethermind (C#): Also supported but not widely adopted; a full node can be run with Nethermind if desired.
So the Base team now advises node operators to run Geth for full nodes and Reth for archive nodes.
Additionally, before cloning the Base repo and starting the node, make sure your server has Docker and Docker Compose set up, because the official node setup is packaged as Docker containers.
Base full node hardware requirements
The Base documentation and engineering team cite quite high requirements for reliable full mainnet node operation:
Component | Recommended Minimum |
CPU | A modern processor with 8-16+ cores |
RAM | 32+ GB (preferably 64 GB or more) |
SSD | 2 TB |
In practice, more RAM helps with performance and caching. The actual disk size can be more accurately derived based on today’s chain size, snapshot size, plus extra room for future state growth. Additionally, reliable, high-bandwidth internet is needed. Plan for at least 500 Mbps-1 Gbps symmetric to avoid sync stalls or peer‐timeouts.
The specs above are the minimum you’ll see recommended to comfortably run a Base node for a smaller scale. To match production performance, however, expect higher-end setups.
Archive node requirements
Archive nodes on Base largely share the same CPU, RAM, and software requirements as full nodes, but they need far more disk space and use a different execution client.
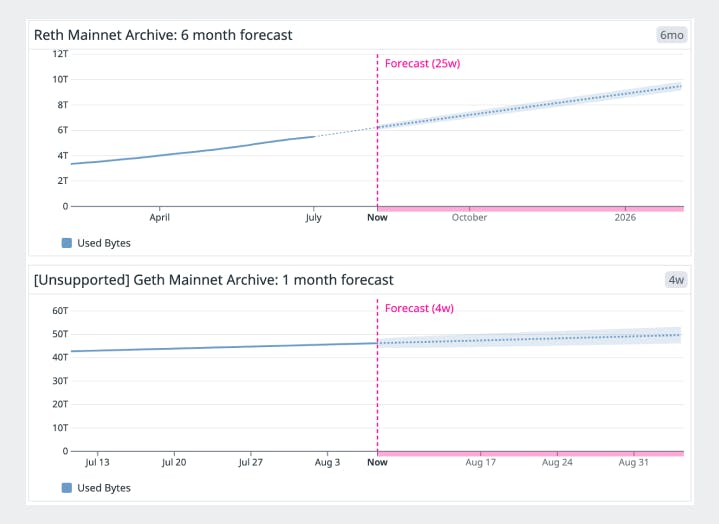
Base’s docs strongly recommend Reth, since Geth’s archive history footprint (~46 TB today) is dramatically larger than Reth’s (~6 TB).

Base Reth archive client uses far less disk than Geth, thanks to a compact DB design / Source: Base Stats
Therefore, when running a node for archive data, prepare for 7 TB of SSD and growing.
How to run a Base node: Guide
In this section, you’ll find essential steps for getting a Base node up and running. Follow each part in order to choose the setup – full, archive, RPC – that best fits your needs
Deploying a Base mainnet full node
Here are the core steps for standing up a Base mainnet full node. Before proceeding, note that Base is an L2, so it requires data from an Ethereum node. It can be a self-hosted ETH node or an endpoint from an RPC provider.
Get the Base node code: This pulls in the OP-Stack Docker setup and example configs.
Configure network settings & point at Ethereum RPC: In your Docker Compose file, enable the mainnet .env. There, set your OP_NODE_L1_ETH_RPC, pointing to an Ethereum RPC URL (and beacon RPC if you run your own).
Launch and monitor: Watch the logs sync blocks, then run a simple RPC call (eth_blockNumber) to confirm it’s live.
Preload a snapshot (Optional): Drop a recent full-node snapshot into your data folder to cut days off your startup sync.
1
2
3
4
5
6
7
8
# 1. Clone the Base node repo (run in your working directory)
git clone https://github.com/base-org/node

# 2. Example .env variables to point your node at an Ethereum RPC endpoint
OP_NODE_L1_ETH_RPC=https://go.getblock.io/<YOUR_ACCESS_TOKEN>

# 3. Start the node
docker compose up -d
Running a full vs archive node
By default, running the above setup yields a full node. If you need full archival history for analytics or explorer indexing, you must run in archive mode.
On Base, that means choosing the archive configuration when cloning the node repo and ensuring the Docker Compose file and .env point to Reth in archive mode.
Getting a Base RPC node
A hosted RPC lets you build on Base without running a node. GetBlock is one of such services offering instant API access to Base full and archive nodes – both Mainnet and Sepolia.

To start building with the Base API, begin with accessing the GetBlock account:
Sign up: Create a free GetBlock account (or log in) and pick a plan. Free tier is great for starters.
Get an endpoint URL: Navigate to “My endpoints” and select a Base mainnet or testnet. (Do not forget to choose the node geographic location and enable the free MEV-protection feature.)
Start using the endpoint: In your code, set the provider to the GetBlock’s URL. e.g.:
1
BASE_RPC_URL=https:/go.getblock.us/<YOUR_ACCESS_TOKEN>/
Make sure to keep an eye on your usage and rate-limit status via the GetBlock dashboard and explore the differences between the shared and premium dedicated plans to find the best fit.
By following these steps, you’ll have immediate, reliable access to the full Base RPC surface without installing Docker, syncing blocks, or managing servers.
In conclusion: Self-hosting vs using hosted Base RPC nodes
Running your own Base node is known to be resource-intensive, especially as a mission-critical backend for Web3 applications or services. In other words, it is pretty costly to get the recommended type of hardware using something like AWS, Digital Ocean, or your own device.
Because of the complexity and cost, many teams and builders opt for RPC providers like GetBlock instead. Using GetBlock means no in-house hardware setup, maintenance, and other things that take significant DevOps effort.
Instead of capital-intensive servers and unpredictable cloud bills, RPC users pay a clear, usage-based fee or flat rate for API access. As the Base team puts it, that can be a better choice unless absolute control is a trade-off that can’t be made.
FAQ
Can I run my own Base node?
How to deploy a Base node?
Is running a Base node profitable?
Popular Posts
June 9, 2021
4 min read
November 9, 2021
5 min read
May 24, 2022
5 min read
March 18, 2021
4 min read

